//jerrywalsh.org

coding, hacking, startups, computer security, technology and more

Converting Vpopmail Aliases to Ezmlm Mailing Lists

Ezmlm (EaZy Mailing List Manager) is a powerful mailing list solution for qmail. It also works well with Inter7's VPOPMAIL too. From a standard ports install (/usr/ports/mail/vpopmail/) , vpopmail will live in /usr/local/vpopmail/ on a FreeBSD system. Here's a small tcsh based script which can be used to create mailing lists for domains. It takes two parameters the LISTNAME(@domain.dom) and the domain name itself. The script checks for the existance of an existing dot qmail file. If one exists the contents will be subscribed to the mailing list (NOTE: This script does NOT cater for "| forward" style lines!). Anyway.. this may be useful to some people..

#!/bin/tcsh -f
#

Make a mailing list for a vpopmail hosted domain

#

Author: jbw

WWW: www.jerrywalsh.org

#

set LISTNAME="$1" set DOMAIN="$2" set BASEDIR="/usr/local/vpopmail/domains/$DOMAIN/" set LISTFILE="$BASEDIR/.qmail-$LISTNAME" set LISTDIR="$BASEDIR/lists/$LISTNAME/"

if ( "$LISTNAME" == "" ) then echo You must specify a list name exit 1 endif

if ( "$DOMAIN" == "" ) then echo You must supply a domain name exit 2 endif

if ( ! -d "$BASEDIR" ) then echo The domain $DOMAIN is not hosted by VPOPMAIL.. add the domain first. exit 3 endif

if ( ! -d "$LISTDIR") then

if ( -e "$LISTFILE" ) then echo Migrating the following emails to the $LISTNAME mailing list... cat "$LISTFILE" && \ mv "$LISTFILE" "$LISTFILE_" echo ----------------------------------------------------------------- endif

/usr/local/bin/ezmlm-make $LISTDIR $LISTFILE $LISTNAME $DOMAIN && \ chown -R vpopmail:vchkpw $LISTDIR

if ( -e "$LISTFILE_" ) then tr -d '&' < "$LISTFILE_" | /usr/local/bin/ezmlm-sub $LISTDIR && \ rm "$LISTFILE_" endif else echo The $LISTNAME@$DOMAIN mailing list already exists, since the following dir exists: echo $LISTDIR endif ```

Resurrecting Harddisks With Damaged Filesystems in FreeBSD

I found two old dead maxtor harddisks I had lying about the place, a 160GB and a 200GB, both were used as storage media on a FreeBSD server (4.X to be exact so these were UFSv1 partitions).

I plugged in the 160GB to my pc.. It would mount but drive performance was awful (in the region of 400kb/s transfers) and after approx 10 minutes it'd fail completely hanging the PC.. anyway.. it appeared from looking at the contents of the drive that I had managed to salvage most of the data from this drive previously so, I moved on to the 200GB hdd instead.   I plugged in the the drive, and the kernel spewed some geom related 'uncorrectable' errors.. I figured this drive must have suffered from some bad sectors.    FSCK confirmed this and I discovered the bad sectors corrupted the primary superblock on the partition.  Fortunately fsck managed to locate an alternate superblock which was still intact. Fiddling a bit with ``dd'', I discovered there was only 3-4 sectors which were bad at the start of the partition.  Because the sectors were bad there was no way for me to mount the partition, even if the alternate superblock was good.

I used dd_rescue  ( from /usr/ports/sysutils/dd_rescue ) to take an image of the bad drive and copy it to a larger 500GB drive. It's important to note that the size of the target drive does NOT matter - as long as it's either the same size or larger than the original drive.  The downside of using a larger target drive is that you won't be able to make full use of all the space on the drive, but i'd imagine that's a job for some partition resizing utility to solve. Anyway.. dd_resure is basically a modified version of dd but designed for dealing with bad sectors. it'll use a large blocksize and reduce the block size if it encounters any bad sectors whilst copying. If after it finds bad sectors it then gets a number of consecutive successful reads the block size is then increased back up again to speed up the imaging process.  Outside of the first 4 bad sectors there weren't any further problems with copying until about 80% into the imaging process:

dd_rescue: (info): ipos: 158322022.5k, opos: 158322022.5k, xferd:    115117.5k
                *  errs:      9, errxfer:         4.5k, succxfer:    115113.0k
             +curr.rate:        0kB/s, avg.rate:     6730kB/s, avg.load:  0.1%
dd_rescue: (warning): /dev/ad1 (158322022.5k): Input/output error!

dd_rescue: (info): ipos: 158322023.0k, opos: 158322023.0k, xferd:    115118.0k
                *  errs:     10, errxfer:         5.0k, succxfer:    115113.0k
             +curr.rate:        0kB/s, avg.rate:     6247kB/s, avg.load:  0.1%
dd_rescue: (warning): /dev/ad1 (158322023.0k): Input/output error!

dd_rescue: (info): ipos: 159550393.0k, opos: 159550393.0k, xferd:   1343488.0k
                   errs:     11, errxfer:         5.5k, succxfer:   1343482.5k
             +curr.rate:    45310kB/s, avg.rate:    29621kB/s, avg.load:  0.7%

At this point the copying slowed right down because dd_rescue started working with tiny blocksizes, i eventually got tired of waiting and cancelled the process to launch it again with a start position of a few thousand increments from the problematic position.. It started off very fast and then encountered more errors.. these errors got gradually less and it seemed i'd eventually bypassed that dodgy area (presumably this was an area of the disk which got alot of writes).  For a 200GB drive the dd_rescue imaging process was suprisingly fast (must have taken less than an hour!). One the process finished i fdisk'd the target disk:

 [root@orion] (/dev): fdisk /dev/ad6
******* Working on device /dev/ad6 *******
parameters extracted from in-core disklabel are:
cylinders=969021 heads=16 sectors/track=63 (1008 blks/cyl)

Figures below won't work with BIOS for partitions not in cyl 1
parameters to be used for BIOS calculations are:
cylinders=969021 heads=16 sectors/track=63 (1008 blks/cyl)

Media sector size is 512
Warning: BIOS sector numbering starts with sector 1
Information from DOS bootblock is:
The data for partition 1 is:
sysid 165 (0xa5),(FreeBSD/NetBSD/386BSD)
    start 63, size 398283417 (194474 Meg), flag 80 (active)
        beg: cyl 0/ head 1/ sector 1;
        end: cyl 1023/ head 254/ sector 63
The data for partition 2 is:
<UNUSED>
The data for partition 3 is:
<UNUSED>
The data for partition 4 is:
<UNUSED>

This looks good. The target drive was actually a 500GB drive, and now fdisk is reporting to see it as 200GB :) .. next I decided to see if a reboot was required in order for devfs to notice the new slices.

 [root@orion] (/dev): ls ad6*
ad6     ad6s1   ad6s1c  ad6s1e

Even better.  Next it was time to FSCK the s1e slice..:

 [root@orion] (/dev): fsck /dev/ad6s1e
** /dev/ad6s1e
Cannot find file system superblock

LOOK FOR ALTERNATE SUPERBLOCKS? [yn] y

USING ALTERNATE SUPERBLOCK AT 32
** Last Mounted on
** Phase 1 - Check Blocks and Sizes
INCORRECT BLOCK COUNT I=38402498 (71232 should be 65792)
CORRECT? [yn] y

INCORRECT BLOCK COUNT I=38402499 (81648 should be 32992)
CORRECT? [yn] y

INCORRECT BLOCK COUNT I=38413449 (6768 should be 208)
CORRECT? [yn] y

INCORRECT BLOCK COUNT I=38413450 (7424 should be 208)
CORRECT? [yn] y

INCORRECT BLOCK COUNT I=38413451 (6000 should be 208)
CORRECT? [yn] y

INCORRECT BLOCK COUNT I=38413452 (6768 should be 208)
CORRECT? [yn] y

etc.

At this point I figured I should have almost passed the -y flag to fsck to auto respond YES to any prompts.. but thankfully fsck didn't ask any more questions after that initial bunch...

 
183419 files, 123017087 used, 70007255 free (66399 frags, 8742607 blocks, 0.0% fragmentation)

***** FILE SYSTEM MARKED CLEAN *****

***** FILE SYSTEM WAS MODIFIED *****

Success!  200GB of data which was completely lost was completely recovered.

Welcome to the New flipworld.net

Yes, unfortunately a massive catastrophe resulted in the loss of the old site.. oh well.. a homebrew CMS system will hopefully result in this site being a little fresher than the last one!

Failover Using Wackamole on FreeBSD

Wackamole is an application that helps with making a cluster highly available. It manages a bunch of virtual IPs, that should be available to the outside world at all times. Wackamole ensures that a single machine within a cluster is listening on each virtual IP address that Wackamole manages. If it discovers that particular machines within the cluster are not alive, it will almost immediately ensure that other machines acquire these public IPs. At no time will more than one machine listen on any virtual IP. Wackamole also works toward achieving a balanced distribution of number IPs on the machine within the cluster it manages.

Wackamole depends on spread for communication with other nodes in the cluster. Spread depends on Bison and Bison 1.X will cause errors while compiling, install /usr/ports/devel/bison2 instead.

1
2
3
4
cd /usr/ports/net/spread && \
make install clean && \
echo 'spread_enable="YES"' >> /etc/rc.conf && \
/usr/local/etc/rc.d/spread.sh restart

Once that's done, download and compile Wackamole .. unfortunately, there isn't a port for this yet.

Wackamole is an excellent tool for ensuring your high-availability applications remain available!

How to Get Broadband if You Can't Get Broadband!

The idea was simple.. find someone who CAN get broadband, and share that broadband out to me wirelessly. In reality this proved alot harder than it seemed as an idea... First of all, where I live is surrounded by trees and mountainous terrain - not very suitable for line of sight technology such as 802.11 wireless.

Step 1 was to find a location which could get broadband and that I could somehow have line of sight to.

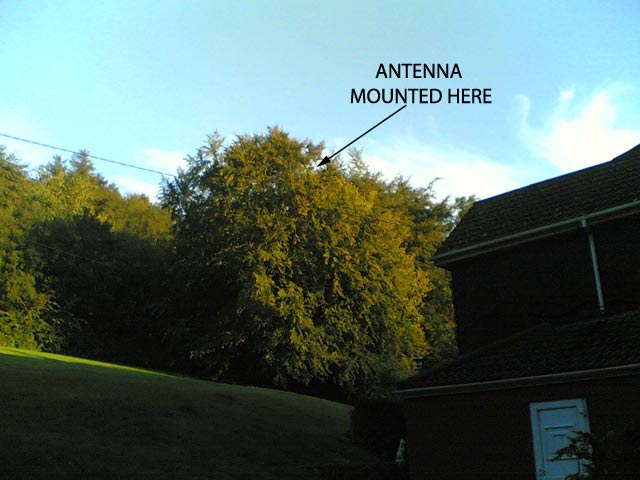
Winter time was approaching and the evenings were getting shorter already - a solution had to be put in place before the winter arrived in order to keep me sane. After a number of tree climbing episodes accompanied with a telescope i eventually spotted a house on a remote hill who I thought I knew the owner of - this was a major strike of luck! After verfiying its physical location I attempted to drive to where I thought the house was to inspect if it was the house i thought it was. My treetop investigation was correct - this was a house of a friend of the family as luck would have it. Finally.. my antenna mounting spot was located:

The idea was put to the owner of the house would he mind a small dish to be mounted on the roof of his house - in exchange for free broadband. To my suprise he was open to the idea! At this point, I decided I would put the previously purchased Stella Doradus wifi mesh antennas to use...

Now a plan had to be formulated... there were a huge number of obstacles yet.. firstly I didn't even know if I could manage to obtain a solid connection between the two points. WiFi suffers huge losses over long runs of coax cable and the run from my house to the point in the tree where i could see the remote site was very long indeed.

The wireless network must be hassle free - i opted to go for linksys routers and run open source linux based software on them for maximum stability and flexibility when it comes to configuring the devices. I went ahead and purchased a WRT54G (€50).
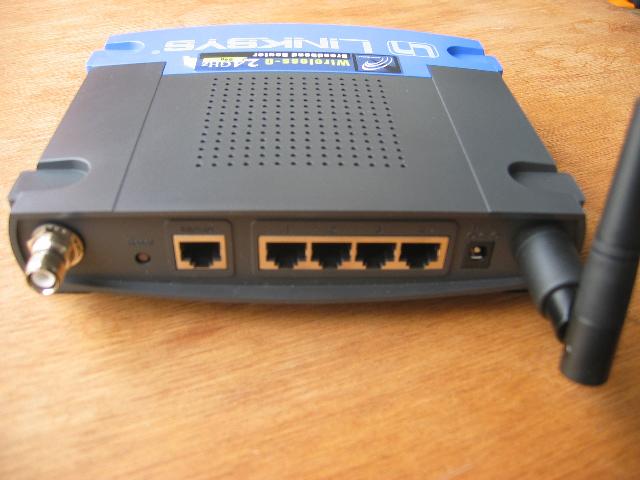
After much research I discovered the only way to get this to work would be to mount the linksys WRT54G up on the tree, powering it and communicating with it using a single CAT5 cable. CAT5 cables contain 8 strands of wire. only 4 of these are used for data exchange, leaving the other 4 redundant. Using PoE (power-over-ethernet) these 4 unused wires can be used to carry power to the device.

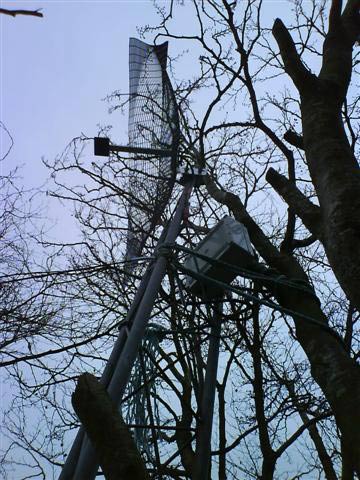
From my old amatuer radio days I have a large radio mast, I decided to put this to some use and erect it in the tree, using the tree as support would mean relatively hassle free erecting of the mast and the need to tie the mast to the ground with metal wires wouldn't be as much of an issue. 4 sections of the mast, each 10 foot were erected over a period of two weeks. Many branches had to be cut away in order to allow the mast to be erected in a proper vertical manner. I almost died doing this at one stage when i fell halfway down the HUGE tree only to land on a branch before i hit the ground.

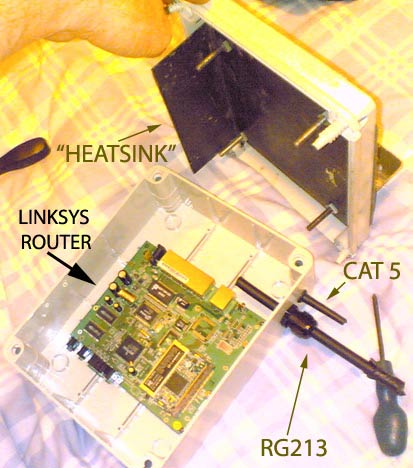
The next step was to mount the linksys up the tree on the mast - this thing needs to just work without problems. A trip to maplin resulted in discovering an outdoor waterproof project box to house the router in. Along with some waterproof grommets for the cable I was ready to go. The linksys was ripped apart leaving only the circuit board and this was put into the project box. Here's how it looked after the cabling holes were drilled:
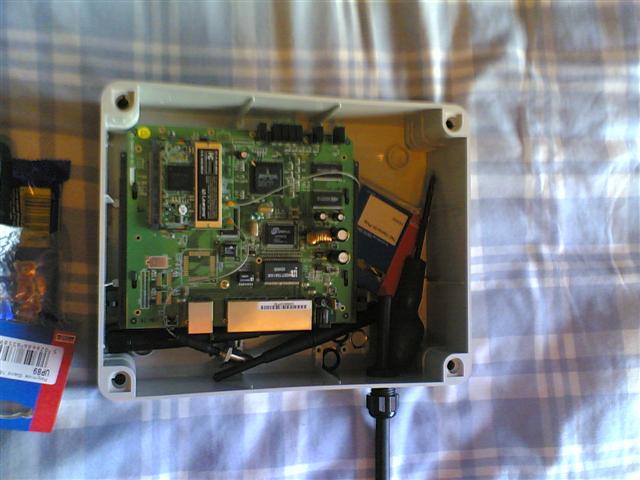
The thick cable on the right is RG213 - very high grade coax for absolute minimal signal loss. This run of cable would be a max of 1 metre to the antenna which would be mounted above the box on the mast itself.
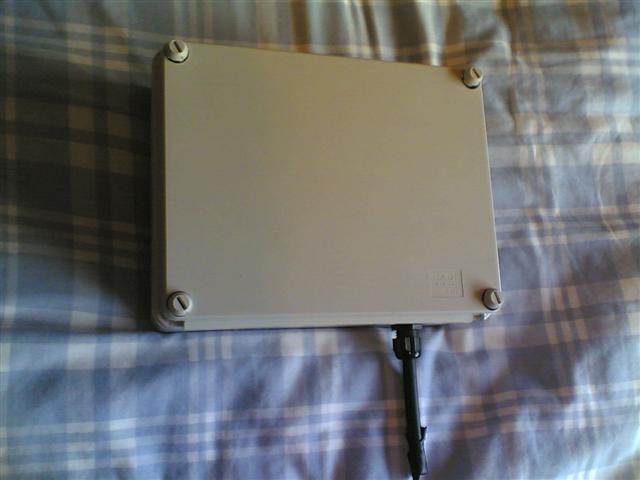
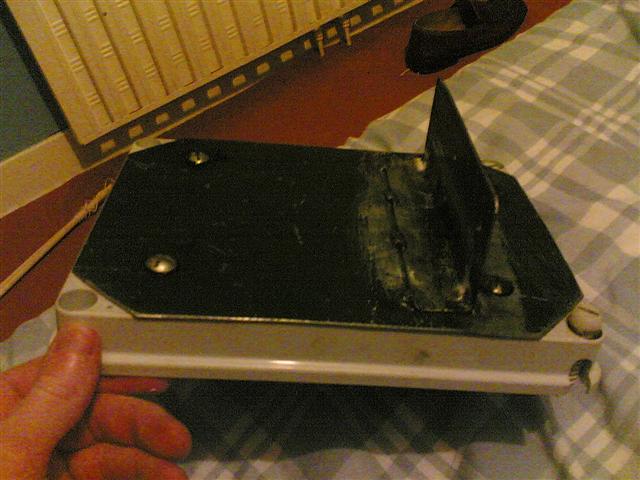
Since the linksys would be in a waterproof box cooling would be an issue, maybe not so much in the cold winter months but definitely when the summer time would arrive. In order to overcome this a metal heatsink was created from some spare metal, the metal was welded, drilled, sanded and then bolted onto the box.

Here's the external part of the heatsink... notice the "bracket" for securing the box to the mast:

My hope was the metal plate inside the box would absorb the heat coming from the transmitter and seep out thru the bolts onto the external metal plate.

With the mast in place the cat5 had to be run from the house... my initial cable was regular indoor cat5, I knew this would not be a permanent solution because it's such flimsy cable - after some initial pains with getting PoE to work the cable was scrapped and replaced with outdoor cat5 that a friend of mine had lying around. This cable was much better - it was still and had a very strong outer plastic layer.

Using some wiring diagrams i got off the internet and some old CAT5 socket boxes the power over ethernet system was constructed successfully.

The linksys is powered by 18 volts to compensate for the power loss in the long run of PoE cat5. A test signal was successfully established without ANY problems - I knew I was now going to have a solid connection between the two endpoints. A smaller dish was mounted on the remote site's roof, and the router was installed and powered up.

I've always had my internet connection (dialup) shared using an old faithful freebsd machine ... I put another network card into this machine which I had lying around and configured a firewall and NAT to provide internet access to the machines on my LAN. BROADBAND HAD ARRIVED!

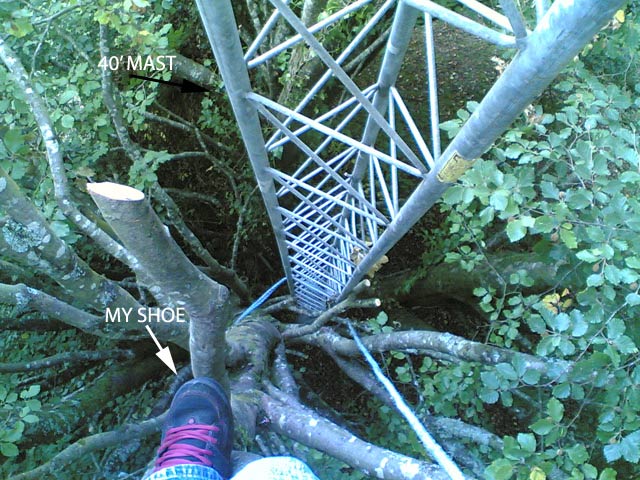
Thou it may not look it from the picture above.. the antenna is situated quite high off the ground:

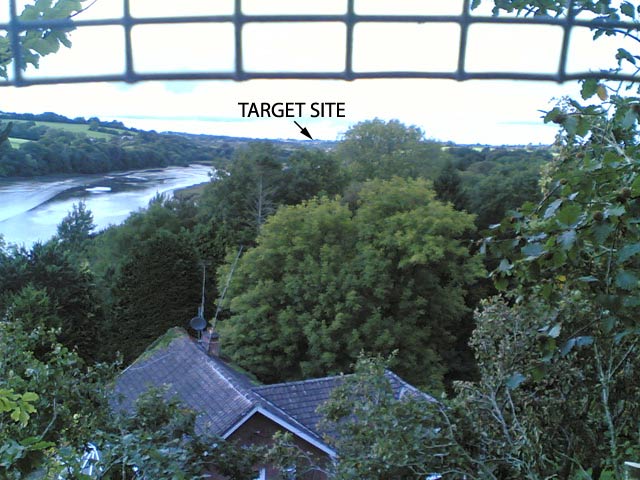
This elevation offers direct line of sight to the house up the river at the other end of the valley, here's a view from the bottom of the antenna on the tree:

At the remote end there's another LinkSys WAG54GS (a 3 in 1 device: wifi, ethernet and dsl modem) which is connected to another directional antenna. Unfortunately the WAG54GS came with a hardwired tiny plastic antenna since linksys did not imagine this device would be used for long range applications. In order to fit the antenna the WAG45GS had to undergo some surgery - the plastic antenna was removed, the coax desoldered and a new connection soldered onto the mainboard which i robbed from another WiFi router i'd lying around the place.

I encountered several annoying problems with the setup after a few days of use. The WAG54GS which was not capable of running the open source software was unstable and seemed to lock up after a few days of being switched on. This was no good and I had to repeatidly ask the owner to restart the stupid thing. I upgraded the firmware to a blistering edge copy i found on a beta firmware linksys site which according to linksys would solve the known problem with lockups in the earlier firmware.

No such luck - the device still started locking up. During these lockups the device was pingable, but could not be access via the web interface and it would not route any traffic.

A hack type solution had to be put inplace - I setup a cronjob which performed a HTTP POST on a nightly basis which rebooted the device. and 5 minutes later enabled "debug mode" which basically just enables a telnet daemon. More weeks passed and I eventually pinpointed a potential problem - a noticed a number of UPNP daemons running on the device which seemed to consume quite alot of its tiny memory space. I disabled UPNP - this seemed to help things!

The result of all this was that I now had a stable network.. my 3MB broadband still was not performing as good as it should.. this led to me experimenting with the wireless network settings.. eventually i found the magic combination - i disabled all "automatic" style settings and changed them to fixed settings. These settings when changed (e.g. Use MIXED [b/g] wifi technology changed to Use B technology, auto detect network speed was changed to a fixed 5.5MBps) resulted in a stable transfer speed.. where I used get up to 60KB was now bursting up to 210KB/s! A vast improvement. I also noticed a constant ping would show sporadic increases in network latency times... changing all these settings from auto to fixed values helped this anomaly too.

Finally, here's a picture of the finished product itself:

There you have it! I have broadband now and it was definitely worth all the hassle.
MySQL on FreeBSD 6

Ultimate speed, using LINUX threads. With a UTF8 character encoding as the default. Simply add this to your /etc/make.conf :

1
2
3
4
5
6
7
8
9
10
# MySQL with LINUX threads & UTF encoding...
.if ${.CURDIR:M*/ports/databases/mysql*}

  BUILD_STATIC=yes
  BUILD_OPTIMIZED=yes
  WITH_LINUXTHREADS=yes
  WITH_CHARSET=utf8
  WITH_COLLATION=utf8_general_ci

.endif

How to Empty/purge the Qmail Outbound Queue

Qmail has been my MTA of choice now for many years. It's fast, small and very secure.

Sometimes it may be desirable to delete all items from qmali's mail queue. The safest way to clean the outbound queue in qmail is to trick qmail into thinking the messages have been around for too long, so it'll give up and discard the messages. This can be done using find in conjunction with touch:

1
find /var/qmail/queue/ -type f -depth 3 -exec touch -t 200001010101 {} ;

Once we've touched the messages we then need to signal qmail to re-run the queue :

1
killall -ALRM qmail-send

Keep an eye on /var/log/maillog to check the progress:

1
tail -F /var/log/maillog

And that's it!

Spamd Spam Assasin

As easy as adding:

1
spamd_flags="-m 20 -c -d  -r /var/run/spamd/spamd.pid"

To your /etc/rc.conf.

 I must warn you that spamassasin is an incredible hog.. if you get high volumes of email you may want to use a procmail/maildrop recipe to only pass certain types of emails to spamassasin (i.e. ones under 150Kb for example).  If you're looking at a milter for high email volumes then I suggest using D-SPAM instead..

Stopping Qmail Autorespond From Replying to Root (e.g. CRON) Mails

Unfortunately, by default autorespond for qmail responds to far too much.. (mails from cron being an example)...

The following patches fixes this issue by telling autorespond to ignore emails from root or 'nobody':

1
2
3
4
5
6
7
8
9
10
11
12
13
14
15
16
17
18
19
20
--- autorespond.c.old   Sat Feb  3 17:07:31 2007
+++ autorespond.c       Mon Feb  5 14:44:54 2007
@@ -598,8 +598,16 @@
                fprintf(stderr,"AUTORESPOND:  Stopping on mail from [%s].n",sender);
                _exit(0);
        }
-
-
+        if(strncasecmp(sender,"root@",5)==0) {
+               /*got one of my own messages...*/
+               fprintf(stderr,"AUTORESPOND : ignoring mail from ROOT (jbw patch)n");
+               _exit(0);                       /*hard error*/
+       }
+        if(strncasecmp(sender,"nobody@",7)==0 || strncasecmp(sender,"noreply@",8)==0) {
+               /*got one of my own messages...*/
+               fprintf(stderr,"AUTORESPOND : ignoring mail from NOREPLY/NOBODY (jbw patch)n");
+               _exit(0);                       /*hard error*/
+       }
        if ( inspect_headers("mailing-list", (char *)NULL ) != (char *)NULL )
        {

Enjoy